When I made a blog post about business cards, I briefly touched on having things simple and having your name on your email and websites. Perhaps I was a bit too vague because I'm still running into emails and websites with "foo foo".
Your email should always be your name. I cannot express enough how important this is. If you're starting out and can't get or afford a domain name that will let you have your name as a dot com you're allowed to temporarily have a gmail or yahoo or whatever makes you happy.
Acceptable:
janesmith@gmail
jsmith@gmail
janes@gmail
janesmithbeauty@gmail
janesmithmakeup@gmail
And so on...
UNacceptable:
sparklesofglitter@gmail
ghettoliciousmakeup@yahoo
Anything that isn't your name is absolutely just a NO!
Your name is not sparklesofglitter. If it's not on your birth certificate, it should not be used in your email or website.
Some may have free websites where you can't help but have that particular websites name all over it. I used to have bridal site through wix.com (that I've left up as an example) but guess what's in between all that? My name! (It's http://yisellsmakeup.wix.com/yisellsmakeup). I can't help that "wix" is in there but I made it a point to implement my name in there so clients can remember. For my updated and permanent bridal website, visit www.yisellsantosmakeup.com.
If you already have a domain name that allows you to have your name as a dot com, then that's fantastic! You're on the right track. My pro site is www[dot]yisellsantos[dot]com along with my pro email which is contact[at]yisellsantos[dot]com.
Acceptable:
info@yourname.com
contact@yourname.com
yourname@yourname.com
The point is, your name is on it!
Please always keep in mind that this is how your client will always remember you. Don't think that just because you're starting out that this is ok. That you can probably just change it later. 2 things can happen, you either don't ever change it because now all your clients have this particular email and to change it now will be a pain in the behind OR you do change it and have to email every single client that you've changed your email and we all know that sometimes that doesn't work. You'll have no choice but to keep the old email just in case someone emails you there. If you disable it, you could possibly lose jobs and/or clients and no one wants that. So now...you're managing two emails. If you ask me, that's just way too much work and your client will forever know and remember you as ghettoliciousmakeup. This is not professional in any way, shape or form.
If you want to be treated and paid like a professional, you need to conduct and handle your business like a professional. I find it difficult to take anyone seriously who doesn't have a professional email or site.
Moral of this story:
Act as a pro
Be a pro
Conduct business as a pro
And please, I beg you, stop with the ridiculous email and site names.

Showing posts with label For the PRO'S. Show all posts
Showing posts with label For the PRO'S. Show all posts
Thursday, May 16, 2013


Tuesday, March 26, 2013
Mascara's, Wands and Keeping Sanitized
But Yisell, I usually keep my mascara's more than 3 months and I'm fine. While that might be so, how many times are you willing to play Russian Roulette with your mascara? Till you get an infection and learn the hard way?

IF YOU'RE A CONSUMER
I've gone ahead and listed my top 5 favorite mascara's which I use both in my kit and for personal use that wont run your wallet into the ground. Now we all know that when getting a mascara it's all about the wand. The formula sort of matters too but not as much. The wand is what gives you the volume and the length that we all women crave. And in this case, size does matter.
1. Covergirl Lash Blast Length - I'm in love with the skinny wand that comes with this mascara. It's especially wonderful if you have small lashes. If the wand is too big, it's a bit harder to get into the base of the lash and create length.
2. Covergirl Lash Blast - Huge wand! But that's great if you already have long lashes but lack volume (such as myself). I don't recommend this to anyone with short lashes.
3. Maybelline Define-A-Lash - I really like the rubber wand that comes with this. It contours and bends to your lashes so it really gets in there. Also, because the "bristles" are small, the wand doesn't pick up a ton of product so less clumping which is a total plus.
4. Maybelline Great Lash - Let me start by saying that this is a classic. I actually used this in my kit for a very long time before exploring other options. It's still a staple in many makeup artists kits and it's the most basic mascara I've ever encountered. There isn't really anything special about the wand. In fact, I find the wand to be too small and not enough fluff to give volume. The packaging though, always give me a sense of nostalgia from when I was a kid. My sister used to have this mascara back in the 80's (we're 11 years apart so when she was 18, I was 7) and I'd just sit there in awe and watch her do her makeup ever so carefully. Perhaps this is why I kept it in my kit for so long.
5. L'Oreal Voluminous Original - I've left this one for last because I have to honest. It's my favorite personally and professionally. I love the wand, not too big, not too small. Great for length and really amazing for volume. I can get into the inner corner of my eye (we all know how hard it is to get in there without poking your eye out) and I can still get the volume I need on the outer corners of the eye while still separating the lashes and it leaving no clumps! WIN!
All in all, get what works best for you. Sometimes you won't know unless you do trial and error but at least you didn't spend $50 on a mascara that probably wont work for you.
IF YOU'RE A MAKEUP ARTIST
As a makeup artist, when mascara goes in my kit, it doesn't matter what kind of wand it has because I never use the wand anyways. A professional and clean makeup artist should always have an arsenal of disposable mascara wands in their kit. Using the same wand on multiple people and double dipping is an absolute NO NO! Now, you can use the wand only and ONLY if you're keeping and washing/disinfecting the wands between use. I used to do this for years because I was tired of constantly purchasing mascara wands. But, that got old and I realized that I was just creating more things to clean (and I don't have to explain the joys of brush washing). I eventually went back to using disposables and saved myself the task of cleaning one more thing. I guess this is why the Maybelline Great Lash is such a staple, because the wand doesn't matter. It's functional and gets the job done. Though, I do have to say that the L'Oreal still takes the cake and I carry that in my kit instead. In the end, use what you feel most comfortable with. Every artist is different and has different work methods. If you're the kind that likes to carry around more than one type of disposable mascara wand (or would like to explore and try different wands), Qosmedix has quite the selection.
Wednesday, March 20, 2013
Building Your Kit
Building your kit when you're starting out could be quite time consuming, hard work and a lot of money coming out of your pocket. But in this business, in order to be a professional and have a kit that is functional (and clean) for jobs and not be considered amateur, you need to put in the time, work and money. But you don't have to completely break the bank. I can help you build your kit the right way without over spending and getting things that you just don't need (coughglittershimmerfeatherscough). You can add the rest of the fluff later after you've gotten the basics and what you need.
NOTE: Please be aware that anything listed below are suggestions that I like and that I carry in my kit.
Skin Care
Skin care is something that should always be in your kit. You cannot skimp on this. If you don't prep the skin properly then anything else you do beyond this will be pointless. Personally I like to carry no more than 2 Moisturizers in my kit. Let's be honest here, I'm a makeup artist, not a dermatologist. I just can't carry a skincare product for every single type of skin out there. So I carry what I feel I use and need the most. Also, all of the products I carry are for sensitive skin because you just never know.
Foundations
This is where it gets tricky because there are just so many types of foundations out there that are absolutely beautiful and I wish I can own them all but really there is no point. Find the foundation that you love the most for your kit. I personally like to have one that gives a dewy, youthful glow (mostly used for print & bridal), and one that's a bit more matte without leaving the skin looking like it's screaming for moisture (mostly used to TV/Film HD). I also generally like liquids that have good cover. If I need to make them sheer I can always use a foundation thinner or moisturizer to do so. No need to buy sheer foundations when you can thin them out yourself. I carry:
Another tricky one. There's so many brands out there and some artists prefer one brand over the other and that's completely fine. Again, get what you feel most comfortable working with. But one thing that without question should always be in your kit...matte neutrals. I can't tell you how having matte neutrals in your kit is super important. Real paying jobs (you know, the type that you can live off and pay your bills) will 90% of the time want something clean and beautiful. That's not to say you can't own any shimmers. There are some beautiful shimmers out there that I use for my catalog work all the time - they're on the list, don't worry.
You should always have a good assortment of lipsticks in your kit. Whether you want to buy them in a palette or buy them individually and make your own lipstick palette, is completely up to you. I like to buy them individually only because most palettes contain colors that you won't other wise find as an individual. Last thing I want to do is re-buy a whole entire palette for just one color because I love it, now I've become attached, use it often, run out of the color and then I can't buy just that one color because its palette exclusive. Defeats the point of saving money doesn't it? Plus, that's a total bummer. All of my lipsticks that I use the most are from different companies depotted into a Z Palette. I always suggest getting an assortment of various pinks, reds, burgandys, plums, corals and nude/neutrals. Brands that I love and use often are FACEatelier, YSL, Shiseido, Yaby, Revlon & Maybelline.
Blush/Contour
Again, get this in palette form. It's just easier and efficient and you get to cover all ranges of skin tones.
The brushes you use are completely and totally up to you. There are so many different brands. Every artist that I've encountered likes different types of brushes for all sorts of reasons. Their softness, the handle, the colors, the multi-functionality. In the end you should use what feels right in your hands. I only want to state one little thing. Your brushes are how you "paint". These are your tools, an extension of you. Go too cheap and you'll end up replacing that brush in no time. But that doesn't mean that you have to go crazy expensive either (unless you want). I like functional brushes but they also have to do their job and be pretty. My most used brushes in my roll are by Bdellium Tools and Royal & Langnickel Silk Collection. Some are even Sephora brand. Just know that whatever you choose as your tools, should work for you!
NOTE: Please be aware that anything listed below are suggestions that I like and that I carry in my kit.
Skin Care
Skin care is something that should always be in your kit. You cannot skimp on this. If you don't prep the skin properly then anything else you do beyond this will be pointless. Personally I like to carry no more than 2 Moisturizers in my kit. Let's be honest here, I'm a makeup artist, not a dermatologist. I just can't carry a skincare product for every single type of skin out there. So I carry what I feel I use and need the most. Also, all of the products I carry are for sensitive skin because you just never know.
- Aveeno Ultra-Calming Moisturizer - I like this because not only does it reduce redness but it calms irritated skin (especially in the winter).
- Embryolisse Lait-Creme Concentre (24 Hour Miracle Cream) - This is by far the best moisturizer I have ever encountered. It just leaves the skin super soft. And it serves as a makeup remover!
- Keihls Ultra Facial Toner - It's milky, doesn't contain alcohol and it doesn't strip the skin of any oils leaving the skin supple, not dry.
- Elizabeth Arden Eight Hour Cream - I call this the "everything cream" because it really does serve as everything. I've used it as moisturizer on super dry skin, lip balm, hand cream and even "mascara" when I don't want to use actual mascara for kids and men (to give some definition).
Foundations
This is where it gets tricky because there are just so many types of foundations out there that are absolutely beautiful and I wish I can own them all but really there is no point. Find the foundation that you love the most for your kit. I personally like to have one that gives a dewy, youthful glow (mostly used for print & bridal), and one that's a bit more matte without leaving the skin looking like it's screaming for moisture (mostly used to TV/Film HD). I also generally like liquids that have good cover. If I need to make them sheer I can always use a foundation thinner or moisturizer to do so. No need to buy sheer foundations when you can thin them out yourself. I carry:
- FACEatelier Ultra Pro - This is my 'go to' foundation and the one that I use the most. I'd say in about 95% of my work I've used this foundation. It's like liquid gold. Covers, leaves the skin looking flawless, dewy and youthful and a little goes a long way. Oh and they're travel friendly! Always a plus when you're traveling for work.
- Make Up For Ever (MUFE) HD - I love this foundation for TV/Film work. It goes on like second skin and just so light. It's the must have for HD and anyone who has super oily skin. It's matte without sucking the life from your skin. Sometimes there even isn't a need to powder. Any time I get to skip a step, is a happy day for me.
- *Optional* - Graftobian Hi-Def Glamour Creme - I love, love, love this foundation the best for women of color. Not to say that the other ones on this list aren't great for darker women, I just personally prefer to work with creams when it comes to women of color. A little goes a long way so be careful, it's smooth and buttery amazingness can turn against you.
Another tricky one. There's so many brands out there and some artists prefer one brand over the other and that's completely fine. Again, get what you feel most comfortable working with. But one thing that without question should always be in your kit...matte neutrals. I can't tell you how having matte neutrals in your kit is super important. Real paying jobs (you know, the type that you can live off and pay your bills) will 90% of the time want something clean and beautiful. That's not to say you can't own any shimmers. There are some beautiful shimmers out there that I use for my catalog work all the time - they're on the list, don't worry.
- Viseart 12 Color Eyeshadow Palette - Where do I even begin to describe this palette. Every pro that I know has this palette and just absolutely swears by it. In fact, it's so beautiful that most of the time it's sold out everywhere! It's the first matte eyeshadow that I've encountered that aren't chalky and blend beautiful (second is the FACEatelier individual matte neutrals)
- Urban Decay Naked Palette - Great palette with a beautiful range of neutrals and it's got both mattes and shimmers. They blend beautifully and I find that I use them a lot for bridal and/or special occasions for that extra glam factor.
- Yaby Best of Both Worlds Palette - What can I say about Yaby except you can't EVER go wrong with their eyeshadows. This palette contains both neutrals (in matte and shimmers) along with some color shadows. Some colors that you'll use a lot, some that you wont use as much. But at least they're in the palette for those "just in case" moments when a client suddenly wants a purple smokey eye.
You should always have a good assortment of lipsticks in your kit. Whether you want to buy them in a palette or buy them individually and make your own lipstick palette, is completely up to you. I like to buy them individually only because most palettes contain colors that you won't other wise find as an individual. Last thing I want to do is re-buy a whole entire palette for just one color because I love it, now I've become attached, use it often, run out of the color and then I can't buy just that one color because its palette exclusive. Defeats the point of saving money doesn't it? Plus, that's a total bummer. All of my lipsticks that I use the most are from different companies depotted into a Z Palette. I always suggest getting an assortment of various pinks, reds, burgandys, plums, corals and nude/neutrals. Brands that I love and use often are FACEatelier, YSL, Shiseido, Yaby, Revlon & Maybelline.
Blush/Contour
Again, get this in palette form. It's just easier and efficient and you get to cover all ranges of skin tones.
- La Femme 12 Color Blush Palette - The pigmentation of this palette is insane! You'll have this for a very long time as you'll use such little product to get the effect you need.
- NARS Bronzing Powder "Laguna" - I know I've said that palettes are key but when it comes to contouring, I use one color on pretty much everyone from fair to medium/olive toned. This color is just so gorgeous and I'm completely in love (and attached) to it. It's got these tiny gold flecks that, when applied, read as a healthy glow and not as a shimmer.
- MAC Bronzing Powder "Matte Bronze" - Another individual (and its MAC! - notice how I don't use anything MAC except for this powder). I carry this bronzer for one purpose and one purpose only. Men! That's right, I use it only when I'm doing male grooming. Why? Because men need matte. I can't exactly go around putting Laguna on their face now can I?
- Yaby Powder Foundation Palette "The Darks" - So you may have the occasional really dark model/client and "Laguna" just isn't going to cut it. That's where this palette steps in. Don't let the "powder foundation" name throw you off. You can absolutely use this as bronzer.
- Mascara - Get a regular drugstore brand. Whichever you like the most. Don't go expensive on mascara because no matter how many times you've used it, once you've opened it, it officially has a life span of 3 months before you need to dispose of it and get another one. Mascara's harbor germs so always remember, 3 months and it's got to go.
- Pencil Liners - Get one in Black and Brown. I like the Urban Decay 24/7.
- Liquid/Gel Liners - Same as above, 1 black, 1 brown. I like the Tarte Amazonian Clay Waterproof Liners (in the pot). I've recommended this liner to friends and some stated to have gone swimming and this liner just doesn't budge.
- Tweezers - I happen to love the Tweezerman brand. I've had one of their tweezers for years now (I carry 2). The other I keep replacing because either I keep losing it or others love it as much as I do and it happens to "walk" off set.
- Eyelash Curler - I carry 2 as well. I have the Shu Uemura one and the Yaby Heated Lash Curler. Both the best of their kind. I've had the Shu one for almost 6 years now (maybe more) and the Yaby heated for 2 years. Why a heated lash curler? Because sometimes you'll get those straight eyelashes that are just impossible to curl and I promise you this heater curler will save your day and make your lash curling way easier.
- Sponges
- Mascara Wands
- Q-Tips
- Cotton Balls/Pads
- Powder Puffs
- Makeup Wipes
- Tissues
The brushes you use are completely and totally up to you. There are so many different brands. Every artist that I've encountered likes different types of brushes for all sorts of reasons. Their softness, the handle, the colors, the multi-functionality. In the end you should use what feels right in your hands. I only want to state one little thing. Your brushes are how you "paint". These are your tools, an extension of you. Go too cheap and you'll end up replacing that brush in no time. But that doesn't mean that you have to go crazy expensive either (unless you want). I like functional brushes but they also have to do their job and be pretty. My most used brushes in my roll are by Bdellium Tools and Royal & Langnickel Silk Collection. Some are even Sephora brand. Just know that whatever you choose as your tools, should work for you!
Thursday, March 7, 2013
Highlighting and Contouring, the Basics
Highlighting & Contouring...that lovely thing we all do to give dimension to the face. It's also that lovely thing that people always have a hard time with. Whether it's applying it on yourself or applying it on others, highlighting & contouring can be tricky and if done wrong, can look like a disaster. And trust me, I've seen some pretty bad H&C out there.
Now, I'm not going to teach you, give you a tutorial or show you step by step on how to do it. Why? Because highlighting and contouring isn't something that can be taught. It is something that needs to be learned with practice and patience. You know how I always say to practice, practice, practice? Well, this is one of those times. But, there are a few things that I did (and still do to this day) that helped me learn how to highlight and contour correctly. Remember, every face is different. You will never highlight and contour the same for everyone.
Whether you're doing a soft or hard application, the way that I found worked best for me (and that has worked well for others that have assisted me) is to "get to know the face". What I mean by that is just that! While your model / client is sitting in that chair waiting for you to make magic, take that time to look at their face. Take a mental note of where all the high points of the face are (highlight), take note of where the hollows are (contour). Now that you have a visual it's time to feel the skin. That's right, take those lovely little feelers and touch their face. I love to do so while I'm moisturizing. I have and will always moisturize with my fingers. This lets me feel the facial muscles & bones and gives me a better sense of the kind of skin texture that I will be working with.
A great way to practice is on yourself (or a friend). Grab a friend and massage his / her face with a little moisturizer. Close your eyes and mentally envision the bones and muscles you're feeling all the while mentally taking notes. Feel the cheekbones, feel the bridge of the nose, feel the temple and forehead Now that you have an idea of what's under the skin, you can now highlight and contour to your liking.
Of course there is way more to this method such as the kind of lighting your working with, the kind of look you're going for, product you're using, blending properly etc., but once you have the basics down and "get to know the face", then you can move forward. You can't expect to run before walking. Without learning the basics, how do you expect to fully grasp the rest that's involved?
Now go forth, practice like crazy and be awesome!
Now, I'm not going to teach you, give you a tutorial or show you step by step on how to do it. Why? Because highlighting and contouring isn't something that can be taught. It is something that needs to be learned with practice and patience. You know how I always say to practice, practice, practice? Well, this is one of those times. But, there are a few things that I did (and still do to this day) that helped me learn how to highlight and contour correctly. Remember, every face is different. You will never highlight and contour the same for everyone.
 |
| All Makeup by Me |
Whether you're doing a soft or hard application, the way that I found worked best for me (and that has worked well for others that have assisted me) is to "get to know the face". What I mean by that is just that! While your model / client is sitting in that chair waiting for you to make magic, take that time to look at their face. Take a mental note of where all the high points of the face are (highlight), take note of where the hollows are (contour). Now that you have a visual it's time to feel the skin. That's right, take those lovely little feelers and touch their face. I love to do so while I'm moisturizing. I have and will always moisturize with my fingers. This lets me feel the facial muscles & bones and gives me a better sense of the kind of skin texture that I will be working with.
A great way to practice is on yourself (or a friend). Grab a friend and massage his / her face with a little moisturizer. Close your eyes and mentally envision the bones and muscles you're feeling all the while mentally taking notes. Feel the cheekbones, feel the bridge of the nose, feel the temple and forehead Now that you have an idea of what's under the skin, you can now highlight and contour to your liking.
Of course there is way more to this method such as the kind of lighting your working with, the kind of look you're going for, product you're using, blending properly etc., but once you have the basics down and "get to know the face", then you can move forward. You can't expect to run before walking. Without learning the basics, how do you expect to fully grasp the rest that's involved?
Now go forth, practice like crazy and be awesome!
Sunday, January 13, 2013
Breaking Into the Industry
Let me start by saying that this blog post is going to be as real as possible. Many that know me know that I don't sugar coat. I'm not mean about it but I'm not going to make it pretty and wrap it up in a bow for you. The last thing I want to do is send you on your way thinking that you're going to start makeup today and become an all star tomorrow. I don't do it to discourage you, in fact I do it to encourage you. Because when you finally make it to where you want to be, you know that you put all your blood, sweat and tears into it. That the prize you wanted at the end of the road was every single bit worth it. And that feeling is glorious! With that said...
Breaking into the industry, no matter where you live, is never easy. It takes hard work, dedication and patience to become a makeup artist. Here's a list of things you'll need:
1. Images of your work
Without images of your work you basically don't exist. Start working on a portfolio ASAP! People can't hire you if they don't know what they're "buying". In order to get images of your work you need to test. Test, test, test! Get a team together consisting of a hair stylist, photographer & wardrobe (if it's fashion/editorial). Wardrobe usually isn't needed if you're just shooting beauty (bare shoulders and up). Know, that you can do the best makeup in the world but if one element is off (hair looks bad, nails not manicured etc), your whole image will fail. And no, you cannot take images with your smart phone. That is just unacceptable! When I had my 9 - 5 job I would test after work and I would test on weekends. I basically had no life for a while. But this is what I wanted to do so I worked hard to build my portfolio. I'd see my boyfriend (now husband) when I could. I'd test in the morning on weekends then hang out with my friends once my shoot was done at night. If you're not working, you should be testing. If you're at home on a Saturday morning watching TV, you're not being productive.
Practice, practice, practice! I cannot stress enough how important this is! Just when you think that you can’t practice anymore, practice again!! Practice on friends, family – aunts, uncles, husband, boyfriend, mom, dad…whatever it takes. You can’t ever get enough practice and no matter what stage of makeup artistry you’re in, you will always learn something new.
Leave the feathers and rhinestones home! Nothing more screams amateur than a portfolio filled with blue eyeshadow, feathers, rhinestones, glitter and crazy colored lashes. We all need to have those creative days, I know, every now and then I like to smudge a little yellow paint across someone’s face. But I do it because my book is filled with a ton of clean work. A client doesn’t want to see how good of a orange smokey eye you can do or how well you apply crazy eyelashes. A client wants to see how well you make the skin look. Master the clean look on all skin colors and ethnicities first and then reach for the crazy stuff. Also, clean work is what pays the big bucks. Pretty much anything commercial such as Dove, Neutrogena, Colgate, Olay, etc. are the kind of clients you want to have if you want to pay your bills.
2. Website
Once you have a couple of images that you're happy with in your possession, acquire a website and start building your online portfolio. Even if you just have 6 images, it's a start and something is always better than nothing. Look at other makeup artist portfolios so you have an idea of layout and what kind of content should be up there.
3. Physical Portfolio
I did a whole entire post on Portfolios a while back. Check it out here.
4. Business Cards
Business cards are such a great networking tool. Give them out to clients and if you're into doing weddings, most bridal shops allow you to leave some cards behind so that customers can take them. Trust me it works! When I was doing weddings, I'd leave my cards at bridal dress shops, cake shops, flower shops...you name it, my card was there. I'd get brides or even friends/family of the bride calling and booking me for their wedding. When I asked them where they found me..."I saw your card at so-and-so bridal shop". For a "how to" with business cards, check out the full blog post I did here.
5. Assist
I find that there really isn't any better way to learn, than by assisting and watching others. I know what I know because I assisted a particular makeup artist for 4 years and another for 2 years. Those artists took me under their wing and made me the artist I am today. I started out as the runner girl. I got water, coffee, food, whatever they needed! Then I was upgraded to brush washer. I washed brushes endlessly. I never really touched a face for almost a year! No pay either! None whatsoever. I wasn't there for the pay. I was there for the experience, to learn, to watch, to see what it was like on a real set with real professionals. Eventually I was allowed to prep the face which eventually led to touching up on set which led to doing just foundation which led to doing a whole face which ended up with splitting the work! If there were 8 models, the key did 4 and I did 4. Eventually I did get pay but it started out small. Some days I'd get $50, some day's I'd get $350. I eventually went on my own. Sometimes I still assist these artist because I appreciate everything that they did for me. What they taught me and what I learned was something special and something that I will never forget. For more info on assisting please check out this blog entry.
6. Patience
Be patient! Being in this business requires a lot of patience. It will not happen overnight. Again, I don’t say this to be negative; I say this to be truthful. The jobs you want will come. Might not be in 2 years or 5 years or even 7 years. I’ve known artist that didn't really start seeing constant work come their way until their 7th – 10th year. Very few have been fortunate in their 5th. There will be days where you don’t even want to look at your kit and you want to quit. We’ve all had it, heck even I’ve had it! But, if this is truly what you want to do, NEVER give up.
Breaking into the industry, no matter where you live, is never easy. It takes hard work, dedication and patience to become a makeup artist. Here's a list of things you'll need:
1. Images of your work
Without images of your work you basically don't exist. Start working on a portfolio ASAP! People can't hire you if they don't know what they're "buying". In order to get images of your work you need to test. Test, test, test! Get a team together consisting of a hair stylist, photographer & wardrobe (if it's fashion/editorial). Wardrobe usually isn't needed if you're just shooting beauty (bare shoulders and up). Know, that you can do the best makeup in the world but if one element is off (hair looks bad, nails not manicured etc), your whole image will fail. And no, you cannot take images with your smart phone. That is just unacceptable! When I had my 9 - 5 job I would test after work and I would test on weekends. I basically had no life for a while. But this is what I wanted to do so I worked hard to build my portfolio. I'd see my boyfriend (now husband) when I could. I'd test in the morning on weekends then hang out with my friends once my shoot was done at night. If you're not working, you should be testing. If you're at home on a Saturday morning watching TV, you're not being productive.
Practice, practice, practice! I cannot stress enough how important this is! Just when you think that you can’t practice anymore, practice again!! Practice on friends, family – aunts, uncles, husband, boyfriend, mom, dad…whatever it takes. You can’t ever get enough practice and no matter what stage of makeup artistry you’re in, you will always learn something new.
Leave the feathers and rhinestones home! Nothing more screams amateur than a portfolio filled with blue eyeshadow, feathers, rhinestones, glitter and crazy colored lashes. We all need to have those creative days, I know, every now and then I like to smudge a little yellow paint across someone’s face. But I do it because my book is filled with a ton of clean work. A client doesn’t want to see how good of a orange smokey eye you can do or how well you apply crazy eyelashes. A client wants to see how well you make the skin look. Master the clean look on all skin colors and ethnicities first and then reach for the crazy stuff. Also, clean work is what pays the big bucks. Pretty much anything commercial such as Dove, Neutrogena, Colgate, Olay, etc. are the kind of clients you want to have if you want to pay your bills.
2. Website
Once you have a couple of images that you're happy with in your possession, acquire a website and start building your online portfolio. Even if you just have 6 images, it's a start and something is always better than nothing. Look at other makeup artist portfolios so you have an idea of layout and what kind of content should be up there.
3. Physical Portfolio
I did a whole entire post on Portfolios a while back. Check it out here.
4. Business Cards
Business cards are such a great networking tool. Give them out to clients and if you're into doing weddings, most bridal shops allow you to leave some cards behind so that customers can take them. Trust me it works! When I was doing weddings, I'd leave my cards at bridal dress shops, cake shops, flower shops...you name it, my card was there. I'd get brides or even friends/family of the bride calling and booking me for their wedding. When I asked them where they found me..."I saw your card at so-and-so bridal shop". For a "how to" with business cards, check out the full blog post I did here.
5. Assist
I find that there really isn't any better way to learn, than by assisting and watching others. I know what I know because I assisted a particular makeup artist for 4 years and another for 2 years. Those artists took me under their wing and made me the artist I am today. I started out as the runner girl. I got water, coffee, food, whatever they needed! Then I was upgraded to brush washer. I washed brushes endlessly. I never really touched a face for almost a year! No pay either! None whatsoever. I wasn't there for the pay. I was there for the experience, to learn, to watch, to see what it was like on a real set with real professionals. Eventually I was allowed to prep the face which eventually led to touching up on set which led to doing just foundation which led to doing a whole face which ended up with splitting the work! If there were 8 models, the key did 4 and I did 4. Eventually I did get pay but it started out small. Some days I'd get $50, some day's I'd get $350. I eventually went on my own. Sometimes I still assist these artist because I appreciate everything that they did for me. What they taught me and what I learned was something special and something that I will never forget. For more info on assisting please check out this blog entry.
6. Patience
Be patient! Being in this business requires a lot of patience. It will not happen overnight. Again, I don’t say this to be negative; I say this to be truthful. The jobs you want will come. Might not be in 2 years or 5 years or even 7 years. I’ve known artist that didn't really start seeing constant work come their way until their 7th – 10th year. Very few have been fortunate in their 5th. There will be days where you don’t even want to look at your kit and you want to quit. We’ve all had it, heck even I’ve had it! But, if this is truly what you want to do, NEVER give up.
Monday, August 20, 2012
Just In Case
Everyone knows that your kit doesn't only consist of just makeup. There are a lot of things that we use other than makeup that are essential to our kits and essential for us to work. Mascara wands, Q-Tips, Sponges etc. But what about those "just in case" items? You know...those items that aren't used much but you keep them around...well...just in case.
These particular items do not take much space in your kit at all. And as many as you know, I'm a kit condensing master. The smaller/compact/less I can make it, the better. These items should live in your kit at all times.
Nail Polish Remover - Models come in with funky nail colors or are told to have nails done but they still show up with them undone. Nail polish remover will save the day (and make you look like a genius).
Nail Polish - Well, you've removed that chipped nail polish. Now what? You have to put something on them. Always carry nude/beige/pink nail polish in your kit. Colors I carry in my kit:
* OPI - Suzi & The Lifeguard
* OPI - Samoan Sand
* Maybelline - Pink Prism
Tide to Go Stain Remover Stick - It happens! People spill things, no one is perfect. You get that one person that just couldn't resist sipping on some Fruit Punch while wearing a white shirt. Great if working with kids.
Mini Sewing Kit - I have yet to use mine but I know many MUA's who have come to the rescue of a bride who didn't notice that one of her dress sequins was falling off.
Mini Shaving Kit - Includes: Shaving Cream, Disposable Razors & Travel Electric Shaver. Whether you're working with men or women, always carry a shaving kit. Men have missed a spot, women forget to shave their armpits (yes it's happened). The electric shaver that I carry is from Conair. I've use it mostly to even out sideburns or the hairline in the back on the neck.
Headache/Cramping/Allergy Medicine - For someone who is deathly allergic to cats and is pretty much allergic to everything in nature during allergy season, I always carry my allergy medicine. I've been stuck shooting in a studio who happens to own a cat or shoot on location right smack in the middle of April when all the pollen is happily floating around. I've also shot with models who get cramps/headaches in the middle of a shoot. As a woman I know those pains are NO JOKE! You'll be seen as a hero if you have those on hand.
Fruit Snacks/Granola Bars etc. - They tell you lunch is at 1pm but it's 2pm and obviously lunch is late. You HAVE to eat. Many of us forget to eat while working (I know because I'm very guilty of doing it myself). It's important to have something with you to hold you up...just in case.
Hair Spray, Hair Brush & Pony Tail Holders - Even when I'm not doing hair, I always carry these items. Why? Hairstylists cancel or models are told one thing and do another. Don't let bad hair ruin your shoot. Brush it, spray it and put the hair up in a bun. Viola! You can still have a great shoot (especially if it's beauty).
That's pretty much all the "just in case" items I carry in my kit. These items don't take much space in your kit and if you make the travel section at Target/Kmart/Walmart/Whatever your best friend, you can find most of those things in a mini version and for cheap.
Friday, June 29, 2012
What's In My (condensed) Kit
When I recently posted a picture on my Facebook Page of my kit in a small Eve Pearl shoulder bag I immediately got requests to post what was in the bag. Well, ask and you shall receive!
Personally, I don't feel that I need to have a million and one things in my kit to do my job. Most of my jobs are catalog, commercial, tv/film, corporate and some bridal. I only carry what I need and I pack according to the job. If I'm doing a corporate client, why do I need to take my blue, yellow and orange liptars? Why bring my green eyeshadow? I don't need it. I'm obviously not going to use it.

.JPG)
Personally, I don't feel that I need to have a million and one things in my kit to do my job. Most of my jobs are catalog, commercial, tv/film, corporate and some bridal. I only carry what I need and I pack according to the job. If I'm doing a corporate client, why do I need to take my blue, yellow and orange liptars? Why bring my green eyeshadow? I don't need it. I'm obviously not going to use it.
So what's in this bag?

All of this!
.JPG)
I made my own working eyeshadow Z Palette (Zebra). By "working" I mean colors that I use the most and fit 98% of my jobs. I also made my own lipstick palette (Leopard). I condensed all of my lipstick tubes and depotted them into the Yaby Empties. Why carry a million tubes of lipsticks? Made my own blush/bronzer palette (Pink) as well.
The Rest of the Items:
- Powderpuff Squad Blush Palette (sadly discontinued and the company no longer exists - had this for ages)
- Foundations - Depending on the job I switch them out. Today I had my MUFE HD packed and yes I can make any color I want out of those 3 colors (118, 128 & 177).
- MUFE Camo Concealers
- Setting Powders - FACEatelier & Laura Mercier
- Gel Liners - Tarte Amazonian Clay in Black & Brown
- Yaby World of Pearl Paints palette, for those "just in case" moments
- Q-Tips
- Cotton Squares in a plastic soap carrier
- NARS Laguna Bronzer
- Lipglosses
- Mascaras, Lash Curler (heated and regualar), Tweezers and Scissors
- Toner, Moisturizer, MUFE Sens' Eyes, Hand Sanitizer, Alcohol, Brush Cleaner
- Mascara Wands (in the mini Cozzette Vessel)
- Elizabeth Arden 8 Hour Cream
- Laura Mercier Primer
- MUFE Uplight
- Duo Lash Adhesive
- Book of Eyeliners and Brow Pencils
- MUFE Flash Palette (never leave home without it)
As always, if you have any questions/requests at all, feel free to comment below.
Monday, May 28, 2012
I Will Not Work For Free!

"Looking for Makeup Artist to shoot for amazing clothing line. TFP (no pay) but you'll get photos for your portfolio, great exposure and you get to work with amazing people. You'll only be needed for 2 hours. If we like you and this does well, we'll pay you for future work. Check out our site [website link here]."
Wait what?!
Let me share with you a little story. Let me start by saying that anything I write on here advice wise is because I have gone through it personally. It has happened to me, I have witnessed it.
When I first started as an artist, I was so eager to shoot and took pretty much anything that came my way because I needed the practice and experience. I also took the "TFP we just need you for 2 hours and great for exposure" jobs and I know for a fact that they will NEVER call you again and will NEVER "pay you later if it does well".
TFP (Time For Prints) is when no one at all gets paid but walks away with some pretty good (or even amazing) photos.
This ad wants you to do a shoot where they will eventually make money selling their clothing but the team that helped put their awesome ad / lookbook / whatever together gets nothing. How is that fair? Also, that whole "we'll hire you again if we like your work" line is crap. They obviously hired the artist because they like their work. Why does the artist have to suddenly prove themselves?
These type of job ads are taking advantage of our newer artist who don't know any better. New artists who will see this as an actual really good opportunity when it isn't.
We need to stand together and put a stop to ads like this. It's because of artists that keep taking "jobs" like these that people will continue taking advantage. This is why our industry is suffering and why many artists no longer get paid what we used to. Negotiating and completely getting robbed are two totally different things! You want us to work? Pay us! Simple as that!
Thursday, April 26, 2012
The Magic of the Makeup Forever Flash Palette

Things I use it for:
Lipstick
Eyeshadow
Blush
Eyeliner
Correcting Foundation
Adjusting Foundation
Creating Foundation
Let me tell you that this palette has saved my life in some occasions. I've cleaned out the kit and OOPS! I forgot to pack my neutral matte eyeshadow palette. Do I panic? Nope! Why? Because I have my MUFE Flash palette. The only time I ever remove that palette out of my kit is when I'm actually using it. I even have a designated pocket for it in my Zuca.
To show you how important it is to have this palette in your kit, I've gone and done my 98% of my face using JUST the MUFE Flash Palette (the 2% is the gloss I used on my lips and mascara).
First things first, create the foundation color. Mixing Brown, White, Yellow, Red & Peach I created my own foundation to match my skin tone.
.JPG)
Second, I made sure that it did indeed match my skin tone. I swatched it on the back on my hand and even somewhat blended a bit just to make sure.

Now I went ahead and took one for the team and took some before, during and after pictures.
NOTE: It's laundry day, my hair's a mess and my brows are over due for some love and grooming...don't judge me =P
I particularly photographed this side of my face which is where I have some old teenage acne (and even some reoccurring) scarring on the chin area. I am completely bare faced here with nothing on but moisturizer.
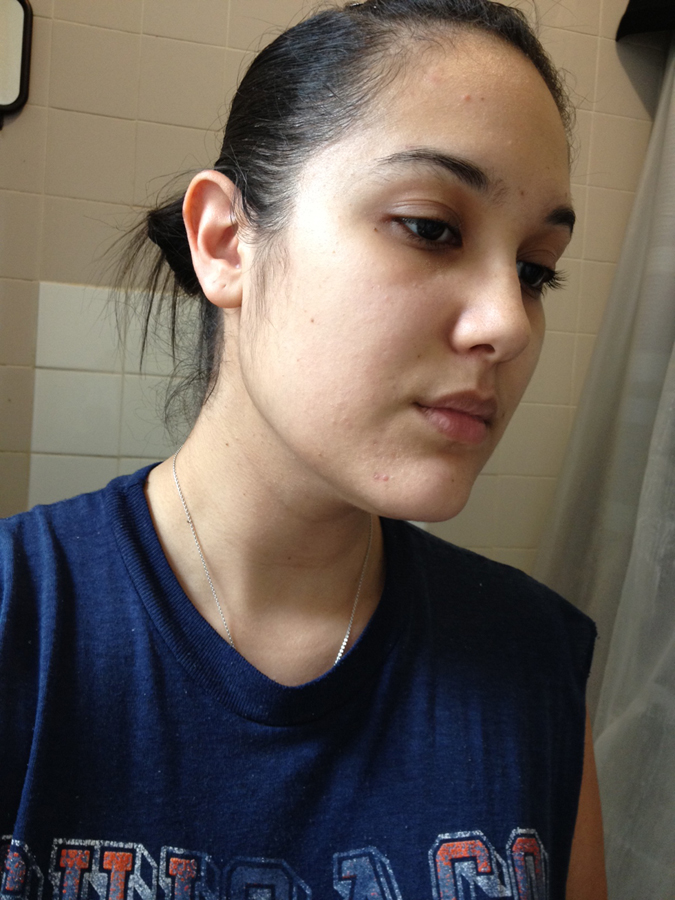
With a Kabuki brush, I've completely buffed in the foundation I created to even out skin tone (and cover up those pesky little scars).

With the same flash palette I've contoured, added rosy cheeks (blush), did a day time brown matte smokey eye and a classy red lip. The colors I used to create this looks were:
Brown (for the shadow and slight contouring)
Magenta (for the blush - buffed also with a kabuki brush for softness)
Red (for the lips - I added my own gloss for drama)

I swear by this palette and so should you. If you already own this palette then you already know what I'm talking about. If you have yet to put this palette in your kit, then I highly suggest it becomes #1 in the priority list. Another artist that swears by this palette is Roshar. He can make anything from it...but then again it's Roshar and I'm pretty sure he can magically bake cupcakes from this palette!
Sunday, April 1, 2012
Business Cards - Revised
Business Cards...that lovely 2 x 3.5 piece of paper that you give out...that people keep...that plays a part in getting you work. A while back I had done a blog post on business cards. I stated that keeping it simple is the best way to go but if you wanted to add a photo, it had to be tasteful. Well, my opinion on that has changed.
As artists, we see a blank canvas and we just can't resist filling it up with art and color. Some people like to put images of their work on their cards and some don't. Putting an image on your card is totally up to you but remember, it can make or break your card. Which is why when I am asked "should I put an image on my business card? If so, how many images should I put?" My answer...NONE! Yup, you read that correctly. None.
Here's why:
* If I put a clean beauty image on my card and hand it out to a fashion client, they're going to assume that all I do is clean work and cannot execute a fashion story.
* If I put a fashion image on my card and hand it out to a catalog/TV client, they're going to assume that all I do is fashion work and won't be able to execute clean every day makeup.
So in turn, I've just lost work because the client assumed that I can only do the kind of makeup that is on my business card. "But, Yisell, they can always just go to my site and see that I have lots of other work." Yes that is true...but do they really go to your site? Does anyone go past page 1 or 2 when searching Google? Once they see the photo on your card, they won't see a reason to go to your site. But if there's nothing there, the WANT to see more. Like the lovely Michael DeVellis once said "Putting a photo on your card tells only ONE story."
Also, what if you've given away your business card 5 yrs ago, and your current work has gone a major improvement? If I'm looking for a makeup artist or an assistant, all I have is that picture from 5 yrs ago that isn't the best. What do you think is going to happen?
What should be on your business card?
* Your full real name. Not "luscious lips makeup" or "sparkles of glitter". First Name and Last Name (ie: Yisell Santos).
* What you do. "Makeup Artist", "Hair Stylist" or maybe you do both "Makeup & Hair".
* Your website, which should be your first and last name. Not "sparklesofglitter.com" or "makeupblush.com". It should look like this: yisellsantos.com or jessicachoimakeup.com. Why? Because "sparkles of glitter" is NOT your name! I don't say "hey, so glad to see you again sparkles of glitter", I say "hey, so glad to see you again Jane Smith".
* Your email address. Preferably it should be with yourname.com. Not gmail or yahoo or aol. (ie: contact[at]yisellsantos[dot]com).
* Your phone number
What should not be in on your business card:
* Photos (as per discussed above)
* Crazy Clipart (or as I like to call it "Foo Foo"). What registers as foo foo? Clip arts of glosses, mascara wands, powder puffs etc. Those are extra unnecessary things that your card does not need, causes a distraction and can make your card look amateurish.
NOTE: Foo Foo is not to be confused with Logo's. Logo's are perfectly ok to have (see Liz's card below).
Here are some examples of really great business cards (phone numbers have been blocked out for privacy purposes):


As artists, we see a blank canvas and we just can't resist filling it up with art and color. Some people like to put images of their work on their cards and some don't. Putting an image on your card is totally up to you but remember, it can make or break your card. Which is why when I am asked "should I put an image on my business card? If so, how many images should I put?" My answer...NONE! Yup, you read that correctly. None.
Here's why:
* If I put a clean beauty image on my card and hand it out to a fashion client, they're going to assume that all I do is clean work and cannot execute a fashion story.
* If I put a fashion image on my card and hand it out to a catalog/TV client, they're going to assume that all I do is fashion work and won't be able to execute clean every day makeup.
So in turn, I've just lost work because the client assumed that I can only do the kind of makeup that is on my business card. "But, Yisell, they can always just go to my site and see that I have lots of other work." Yes that is true...but do they really go to your site? Does anyone go past page 1 or 2 when searching Google? Once they see the photo on your card, they won't see a reason to go to your site. But if there's nothing there, the WANT to see more. Like the lovely Michael DeVellis once said "Putting a photo on your card tells only ONE story."
Also, what if you've given away your business card 5 yrs ago, and your current work has gone a major improvement? If I'm looking for a makeup artist or an assistant, all I have is that picture from 5 yrs ago that isn't the best. What do you think is going to happen?
What should be on your business card?
* Your full real name. Not "luscious lips makeup" or "sparkles of glitter". First Name and Last Name (ie: Yisell Santos).
* What you do. "Makeup Artist", "Hair Stylist" or maybe you do both "Makeup & Hair".
* Your website, which should be your first and last name. Not "sparklesofglitter.com" or "makeupblush.com". It should look like this: yisellsantos.com or jessicachoimakeup.com. Why? Because "sparkles of glitter" is NOT your name! I don't say "hey, so glad to see you again sparkles of glitter", I say "hey, so glad to see you again Jane Smith".
* Your email address. Preferably it should be with yourname.com. Not gmail or yahoo or aol. (ie: contact[at]yisellsantos[dot]com).
* Your phone number
What should not be in on your business card:
* Photos (as per discussed above)
* Crazy Clipart (or as I like to call it "Foo Foo"). What registers as foo foo? Clip arts of glosses, mascara wands, powder puffs etc. Those are extra unnecessary things that your card does not need, causes a distraction and can make your card look amateurish.
NOTE: Foo Foo is not to be confused with Logo's. Logo's are perfectly ok to have (see Liz's card below).
Here are some examples of really great business cards (phone numbers have been blocked out for privacy purposes):
Liz Washer

Front

Back
Victor Amos

Front

Back
Mine

Front

Back
Wednesday, March 28, 2012
Freelancing, Filing Taxes and Keeping Receipts
Filing your taxes and keeping receipts/records of everything is a daunting task but a very necessary one. Keeping track of invoices, receipts, pay stubs, tax forms etc. is one of the most important things as a full time freelance makeup artist.


Because we are freelancers and most jobs do not take out taxes, when tax season comes most of the time you won't get a return. It's not like a day job where the government takes out taxes every week from your pay and at the end of the year you get it back. Most of the time you will probably owe the IRS money. How much money? Well that all depends on how much you worked and the amount you made that year That's why it's important to keep your receipts.
Tax Forms
At the end of the year (or the beginning of the new year), the companies you worked for will send you a tax form only if you made $500 and above. If you worked for X Company one time in 2011 and only made $400, they are not obligated to send you a tax form and you don't have to claim that in your taxes. But if you worked for X Company 10 times and made $4,000, then by law they are entitled to send you a tax form (make sure they do) and you must claim it in your taxes. If it goes unclaimed, I promise you it will come back to you the following year to bite you in the butt.
You will get multiple tax forms so make sure to keep them in a safe place until every single company you worked for sends you a form. Once you have them all in your possession, that's when you take it to your accountant. Discuss with him/her what would be best for you (depending on your status). Are you married, single, kids, no kids, do you want to file joint or separate etc.
Receipts
Any and every time you make a purchase for your kit, for a client, for a production, you must keep all of your receipts. This can help your taxes when filing for a return (if any). You purchased these things to get the job done, therefore it counts as part of your work expenses. Type of receipts to keep:
- Transportation - If you took a train, a bus, a ferry, a plane or even if you drove there and filled up your tank.
- Makeup/Hair Products - A can of spray, a simple eyeliner or a sponge.
- Literature - Any magazine or a book you purchased for reference or to help you create a character.
- Food - If you were on the job and you bought an iced coffee or a sandwich.
It is best to keep your work expenses separate from your daily life/home expenses. It's just easier for you and everyone else at the end of the year when you have to calculate everything. If you go to Target and buy a lamp and a mascara, have the lamp on one receipt and the mascara on another.
Misc.
Now lets say you worked a job in December of 2011 but your paycheck doesn't come in until February 2012 (and it's dated 2012), you will not get a tax form from that company until early 2013. Technically it doesn't count as a 2011 job. Because the date on the check says 2012, that's the year that it applies to.
Shoeboxed
I recently just found a wonderful app for my iPhone called Shoeboxed. I wish I would have found it sooner, would have definitely made my 2011 receipt tracking a lot easier and more organized (I admit, I lost some receipts along the way). This lovely app keeps all of your expenses tidy and tied in a little bow. All you do is take a picture of your receipt, press submit and the lovely shoeboxed team does the rest (they input the date of purchase, amount, name of store...all that jazz). Once the receipt has been processed they send you a friendly email pretty much letting you know that they're awesome and that everything is finished. Best part? The app is FREE. You can email yourself reports and even log on from a computer. Here are some pics I captured from my iPhone app.


Now at the end of 2012, I don't have to calculate anything. Shoeboxed does it for me and I have less stress and more time to do other things...like shopping!
NOTE: After some research (and a very good question from a blog reader) I read in the reviews (not in the info section of the app) that you get up to five free receipts per month. You will then have to purchase additional receipt storage at .50 cents a pop OR $9.95/month. Personally I think it's worth it (I only shop when I need).
Please note that this is how I do my taxes. Different states have different laws.
If anyone has any questions at all, I'm always more than happy to respond and help to the best of my ability.
Thursday, February 23, 2012
Royal & Langnickel Brushes

A few weeks back I was invited to a Royal & Langnickel Blogger Breakfast where they would have a complimentary breakfast, a presentation by Kevin James Bennett and complimentary gift bags. Inside the gift bag was a Royal & Langnickel S.I.L.K Pro Synthetic 12 Piece Set and a Majestic 7 Piece Paint Brush Set. I know what you're thinking, Paint Brush Set? As someone with an art background (drawing, painting etc) I've purchased art store paint brushes to use in my makeup kit. Sometimes the art store quality has been better than some of the beauty brushes out there.
Royal & Langnickel is a family owned business that started out making paint brushes and within the past few years started making Beauty Brushes as well. One of their best sellers is the S.I.L.K Pro collection and I have to say these brushes are absolutely amazing. They're soft to the touch and literally just glides over the face for a flawless finish. The construction of the brush itself says a lot. The ferrule (the metal part that connects the bristles to the handle) is made of chrome-plated brass which pretty much guarantees that the metal wont deform or rust and because the ferrule is pressed twice into the hard wood barrel handle, your brush handle will stay put and never become loose or fall off. My favorite brushes from this set is the Angled Eye Shadow Brush and the Blush Brush.
SILK Pro 12 Piece Set

The SILK Pro 12 Piece Brush Set Includes:
Powder Brush
Blush Brush
Eyeshadow Brush
Foundation Brush
Smudger Brush
Liner Brush
Eye Fluff Brush
Eyeliner/Brow Brush
Flat Liner Brush
Brow/Lash Brush
Concealer Brush
Lip Brush
Majestic 7 Piece Round Short Handle Paint Brush Set

The Majestic set is also super soft and already I've used them for applying foundation on face and body, concealer (both large and small areas), smudging eyeshadow and applying lipstick/gloss. Another thing that I love about this brush set is that the handle comes with a slanted end which is absolutely perfect for scooping out product (in the case that you don't have a spatula or mixing knife).
.JPG)
Majestic 7 Piece comes with brush no. 2, 4, 8, 12, 16, 20 & 24.
As for the event, the Royal & Langnickel staff and president were so nice and helpful in answering any questions I might have had. Here are some photos for your viewing pleasure.
.JPG)
.JPG)
.JPG)

.JPG)
For more information on Royal & Langnickel, their brushes, brush sets and instructional how to videos please visit www.royalbrush.com.
Tuesday, February 21, 2012
A Secret Weapon for Skin Care
A Secret Weapon for Skin Care
by Laura DeAngelis, NASM CPT, AFAA Group Exercise Instructor
No doubt you visit Yisell’s blog and website for great tips about how to keep your skin looking its best. Whether it’s a skin-smoothing body scrub for the shower, oil-free foundation for the face or night cream to keep those Crow’s feet at bay, many of us invest in products to maintain a healthy glow from head to toe. Well, guess what? There’s a secret weapon that can help these products do their jobs even better. It’s called exercise.
There are a several ways exercise can improve your skin’s appearance:
If you’re still looking for some motivation to incorporate fitness into your life, hopefully knowing you’ll be on your way to achieving that healthy glow from the inside-out will get you moving and start your journey to have fun, be fit and feel fabulous!
 Laura DeAngelis is an independent personal trainer in New York City who received her certification through the National Academy of Sports Medicine (NASM). She’s also a certified Group Exercise Instructor through the Aerobics & Fitness Association of America (AFAA) and a Licensed Zumba® Instructor. When she’s not training, Laura currently works as the Director of Production at West Glen Communications, Inc. where she also hosts “Health & Home Report.” For more of Laura’s health and fitness tips, check out her blog at LauraLovesFitness.com
by Laura DeAngelis, NASM CPT, AFAA Group Exercise Instructor
No doubt you visit Yisell’s blog and website for great tips about how to keep your skin looking its best. Whether it’s a skin-smoothing body scrub for the shower, oil-free foundation for the face or night cream to keep those Crow’s feet at bay, many of us invest in products to maintain a healthy glow from head to toe. Well, guess what? There’s a secret weapon that can help these products do their jobs even better. It’s called exercise.
There are a several ways exercise can improve your skin’s appearance:
- Bye-Bye Toxins! Whether you break a sweat with a morning run, after-work interval training on the elliptical machine or a Zumba® class, sweating cleanses the body of toxins that can actually clog pores and cause breakouts.
- Boost Your Blood Flow! One of the countless benefits of exercise is that it increases blood circulation throughout the entire body. That means better delivery of oxygen and nutrients to all your organs, and your skin happens to be the largest organ in the human body. Considering many of us purchase skin care products based on the beneficial nutrients they contain, exercise is a way to compliment those products from the inside out by pushing essential nutrients to the skin so your skin can radiate a natural glow.
- Get Rid of Stress! It’s no secret stress has a laundry list of negative effects and wreaking havoc on your skin is one of them. I can honestly say a good workout has always been able to right whatever ailed me whether it was a stressful day at work or a challenging time in my personal life. Stress can also lead to flare ups of certain skin conditions including psoriasis, so exercise can be one way to this aggravating factor in check.
If you’re still looking for some motivation to incorporate fitness into your life, hopefully knowing you’ll be on your way to achieving that healthy glow from the inside-out will get you moving and start your journey to have fun, be fit and feel fabulous!

Tuesday, February 14, 2012
How To Handle Peer Over Stepping
In a world where there are so many creative minds all in one room, many times your peers don't realize that they're crossing the line from suggestion to direction. I'm always open to suggestion. If you can improve on something, why not? But when your peer is actually giving you direction and over stepping the boundaries, something needs to be said.
I had this happen a few months back where the stylist of a production I was working on was doing a lot of over stepping. He felt that because he was friends with the director of the project, that he can tell me what to do. He was pushy, loved to hover instead of doing what he was originally there to do and I even caught him "adjusting" makeup & hair! As many of you know me, I wasn't having it. I took steps to make him aware that he was over stepping his boundaries. Sometimes following these steps works and sometimes it doesn't. Whether you want to deal with it or not is completely up to you. Here's what I did:
A Little Extra...
Did you know that in the real (union) world of TV/Film if anyone over steps their boundaries you can be fired on the spot? Whether it's hair or makeup or props, you're there to do what you were hired for and in no way are you to over step or give any kind of suggestion (unless you're the director, producer etc). A friend of mine who's in the union told me a story about a makeup artist who lint rolled the actor (that's wardrobe's job). Although she meant well, she over stepped and was heavily reprimanded. If you're makeup, you're makeup. That's it! You can't go around handing out bobby pins (that's hair) or giving out band aids (that's props). Take care of what you were hired to do and everything will go smoothly.
I had this happen a few months back where the stylist of a production I was working on was doing a lot of over stepping. He felt that because he was friends with the director of the project, that he can tell me what to do. He was pushy, loved to hover instead of doing what he was originally there to do and I even caught him "adjusting" makeup & hair! As many of you know me, I wasn't having it. I took steps to make him aware that he was over stepping his boundaries. Sometimes following these steps works and sometimes it doesn't. Whether you want to deal with it or not is completely up to you. Here's what I did:
- I spoke to the AD (Assistant Director) about how I felt. She pulled him aside and expressed how I felt (that didn't work).
- I spoke to the 2nd AD (that didn't work either).
- I pulled him aside myself and expressed how I didn't appreciate his constant over stepping (that worked for all of 2 days).
A Little Extra...
Did you know that in the real (union) world of TV/Film if anyone over steps their boundaries you can be fired on the spot? Whether it's hair or makeup or props, you're there to do what you were hired for and in no way are you to over step or give any kind of suggestion (unless you're the director, producer etc). A friend of mine who's in the union told me a story about a makeup artist who lint rolled the actor (that's wardrobe's job). Although she meant well, she over stepped and was heavily reprimanded. If you're makeup, you're makeup. That's it! You can't go around handing out bobby pins (that's hair) or giving out band aids (that's props). Take care of what you were hired to do and everything will go smoothly.
Monday, January 30, 2012
Makeup for Mature Skin
 |
| Photo Copyright of Blue Hair Salon |
So, what type of products should you use?
Skincare
I've hardly encountered a woman over 45 who already didn't have her own personal skin care products that she swears by and has used for years. Most of the time I end up using what they use in the attempt to make my client feel at ease and comfortable. But I have met some women who've spent 50 years of their life with nothing but chapstick in their purse and absolutely no clue as to which products they should try. In those cases I carry:
Moisturizer
Both of these products pack a punch so a little goes a long way. We don't want overly hydrated skin either or the makeup will move around and not stay on.
* Embryolisse Lait-Crème Concentrè (24-Hour Miracle Cream)
* Elizabeth Arden Eight Hour Creme
Toner
I only tone mature skin if absolutely necessary. If I do, I always use a hydrating toner, never an alcohol based. Remember, we're trying to hydrate the skin, not dry it out.
* Kiehl's Ultra Facial Toner
Foundations
I am a firm believer that foundation should be used to even out skin tone instead of being caked on to cover imperfections. This is why we have concealer. Depending on the thickness/thinness of the foundation, it should be used sparingly. I love to apply it with the beauty blender.
* MUFE Liquid Lift Foundation
* Laura Mercier Silk Creme Foundation
* FACEatelier Ultra Foundation
* Elizabeth Arden Intervene (Never used it myself but know many senior artists that LOVE this foundation for mature skin)
Concealer
I hardly use correctors but when I do it's either to cover tattoo's, bruises, broken capillaries or very dark under eye circles. Green to cover reds and orange to cover browns and blues. The concealer/corrector you use is really up to you. I don't carry any special ones for mature skin. I just use what I feel is best depending on how much coverage is needed.
Extras
Eyeshadows
I stay away from anything too shimmery or frosty and lean towards pearlescent and matte. No one wants to see a mature woman with shimmery eyeshadows.
Lipsticks
I lean towards colors such as burgundy, amethyst, coral and dusty rose. No baby pink lips please.
Eye Creams
I'm not a huge eye cream user. If under eyes are a bit dry I just mix some of my moisturizer into the concealer. If the client has their own eye cream that they like to use, I just use that.
Powders
I generally don't powder mature skin and if I do, I do it on the T-Zone only using a translucent powder. Which brings me to cheek color. I don't use powder blushes either. Cream or gel blushes are key and should not have a powdery finish. The only powder I've used that I feel works best for mature skin is the Laura Mercier Invisible Loose Setting Powder. I've even dusted very, very little to the under eye area.
Subscribe to:
Posts (Atom)